In this blog I will explain how to
set up the platform required for data ingestion using Apache Spark. Spark
is a a fast and general engine for large-scale data processing in the Hadoop eco
system which is written using the scala language. It is highly scalable and fast. It is really a hot cake in the markets now.
The soft wares that is installed and set up
in this blog are for a SMACK stack set up. SMACK is a Data processing platforms architectures with
Spark, Mesos, Akka, Cassandra and Kafka.
- Spark - fast and general engine for distributed, large-scale data processing
- Mesos - cluster resource management system that provides efficient resource isolation and sharing across distributed applications
- Akka - a toolkit and runtime for building highly concurrent, distributed, and resilient message-driven applications on the JVM
- Cassandra - distributed, highly available database designed to handle large amounts of data across multiple datacenters
- Kafka - a high-throughput, low-latency distributed messaging system designed for handling real-time data feeds
Objective:To install and configure the below soft wares in the order given below
- zookeeper-3.4.10
- kafka_2.12-1.0.0.tgz
- scala-2.11.6.tgz
- spark-2.2.1-bin-hadoop2.7.tgz
- apache-cassandra-3.0.14-bin.tar.gz
Prerequisite:
- Create a common folder; here in this ILLUSTRATION’s case a folder as /datavibe_Install_directory has been created
- Set the privileges to the folder
- chmod -R 777 /datavibe_Install_directory
- Install JDK (detailed steps are in the link already)
- Ensure that user has Sudo su privilege; this is required for the whole installation process
- In a nutshell ;for any installation navigate to the respective folder where the installable resides and then untar the same and then proceed
Step 1:
Install Jdk
The detailed steps are in the link Step 1
Step 2:
Set the env variable
The detailed steps are in the link Step 1
Point to note here is variable is set correctly in the .bash_profile file
vi .bash_profile
Type i
Enter the following in the .bash_profile file:
export JAVA_HOME=/usr/lib/jvm/jre-1.8.0-openjdk
export PATH=$PATH:$JAVA_HOME/bin
Type Esc :wq Enter
Step 3:
Install Zookeeper
Navigate to the folder where the installable is located and then un zip the file
The detailed steps are in the link Step 2
Please note: Don’t stop the Zookeeper server as mentioned in the last ste of the link because it is required for the KAFKA server to start
Few of the commands:
tar -zxf zookeeper-3.4.10.tar.gz
cd zookeeper-3.4.10
mkdir data
Screenshot of the Zookeeper server:

Step 4:
Install KAFKA
The detailed steps are in the link Step 3
Please note: The Zookeeper has to be up and running for KAFKA server to start.
Few of the commands with the file name relevant for this ILLUSTRATION:
tar -zxf kafka_2.12-1.0.0.tgz
cd kafka_2.12-1.0.0
KAFKA Server start screenshot:

Step 5:
Install SPARK
The detailed steps are in the link
You can leave step 1 in the link since we have already installed Java
To install SPARK we have a prerequisite to install SCALA
Install SCALA:
The detailed steps are in the link step 4
Screenshots:
.bash_profile file

Scala version check:

Step 5.1:
Spark installation continued:
Once after installing SCALA install spark form the link step 6
Navigate to the respective folder and the untar the file
tar xvf spark-2.2.1-bin-hadoop2.7.tgz
The .bash_profile will have the below entries by now:
export PATH = $PATH: /datavibe_install_directory/spark/spark-2.2.1-bin-hadoop2.7/bin
export JAVA_HOME=/usr/lib/jvm/jre-1.8.0-openjdk
export PATH=$PATH:/usr/lib/jvm/jre-1.8.0-openjdk/bin
export PATH=$PATH:/datavibe_install_directory/scala/scala-2.11.6/bin
export PATH=$PATH:/datavibe_install_directory/spark/spark-2.2.1-bin-hadoop2.7/bin
Spark server screenshot:

Step 6:
Install Cassandra
The detailed steps are in the link
Please note:
- The below step in the link is not done as of now:
SSH Setup and Key Generation
- In the link step 5 of configure java alternatives are NOT done as of now
- Installing Java step can be ignored since we have already done the same.
- Cassandra.yaml file configuration step is not done in this ILLUSTRATION since it is a single node cluster. However for this version Cassandra.yaml file was in the below location
/datavibe_install_directory/Cassandra/cassandra/conf
Navigate to the Cassandra software directory
Run the below commands:
tar zxvf apache-cassandra-3.0.14-bin.tar.gz
mv apache-cassandra-3.0.14/* Cassandra
As super-user, Make the below directories and give access
mkdir /var/lib/Cassandra
mkdir /var/log/cassandra
[root@linux /]# chmod 777 /var/lib/cassandra
[root@linux /]# chmod 777 /var/log/cassandra
Configure Cassandra home in the .bash_profile:
In this case Cassandra home is:
/datavibe_install_directory/Cassandra/Cassandra
Open the .bash_profile and enter the below entry:
Commands:
Cd ~
Vim .bash_profile
Type i
export PATH = $PATH: /datavibe_install_directory/spark/spark-2.2.1-bin-hadoop2.7/bin
export JAVA_HOME=/usr/lib/jvm/jre-1.8.0-openjdk
export PATH=$PATH:$JAVA_HOME/bin
export PATH=$PATH:/datavibe_install_directory/scala/scala-2.11.6/bin
export PATH=$PATH:/datavibe_install_directory/spark/spark-2.2.1-bin-hadoop2.7/bin
export CASSANDRA_HOME=/datavibe_install_directory/Cassandra/Cassandra
export PATH=$PATH:$ CASSANDRA_HOME /bin
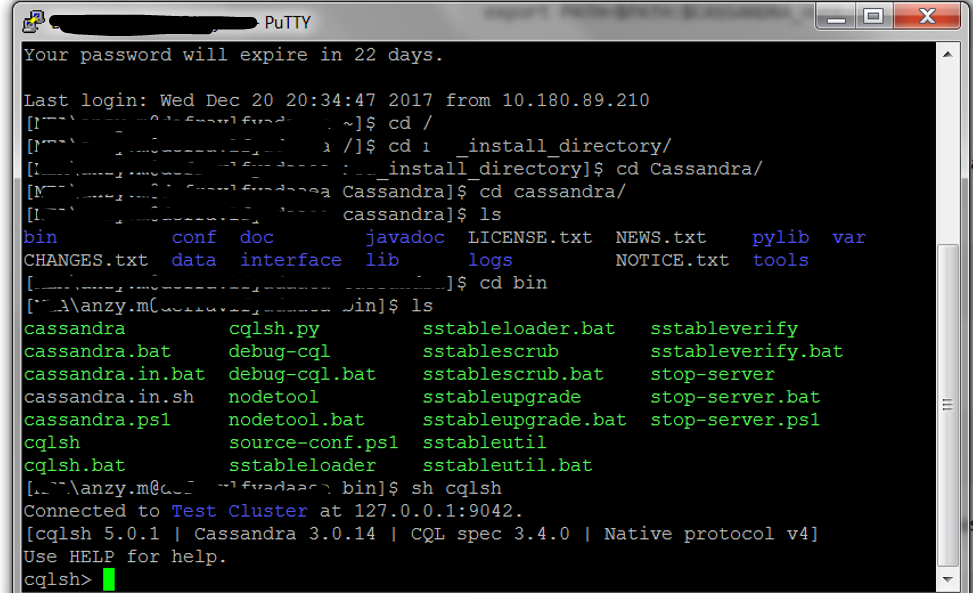
Cassandra Screenshot:
Navigate to the path and type the commands
Sh Cassandra
Sh cqlsh
Great article! It's really a pleasure to visit your site. I've been following your blogs for a while and I'm really impressed by your works. Keep sharing more such blogs.
ReplyDeleteSpark Training in Chennai
Spark Training Academy Chennai
Mobile Testing Training in Chennai
Mobile Testing Course in Chennai
Unix Training in Chennai
Unix Shell Scripting Training in Chennai
Spark Training in Velachery
Spark Training in Porur